

Serama Series 4 - Tails

For this installment of our Serama Series, we’re going to talk about the tail of an American or Traditional Serama.
The Standard calls for an upright tail — one that is upright enough it almost touches the back of the bird’s head. Males should have sickle feathers that “slightly curve.”
Some faults in the tail include sickle feathers that have too much curve or a pinched tail. The sickles should not resemble those of an Old English Game Bantam. Another fault is a tail angle that is too low.
Disqualifications include wry tail and squirrel tail.
Wry tail is when the bird has a curve in the spine at the base of the tail — think scoliosis. The tail then leans to one side or the other instead of staying centered. In wry tail, the tail cannot cross the bird’s center line and go to the opposite side. You can test your bird to determine whether it has wry tail or just a leaning tail — neither of which should be bred.
Squirrel tail is when the tail leans too far forward toward the bird’s head rather than being vertical. Sometimes, a bird may appear to have a squirrel tail due to being very tight-backed. It’s important to look at the base of the tail to see which direction the feathers grow.
Think of a tree: the trunk can be perfectly vertical while the branches curve, and that’s fine. But if the trunk itself leans — that’s where the problem lies.
When viewing the bird from behind, you want to see a nice A-frame shape. You don’t want to see a pinched tail.
Let’s get into it with photos.

Figure 1: These two girls have pinched tails. See how both sides of their tails are very close together from top to bottom? We don’t want that.
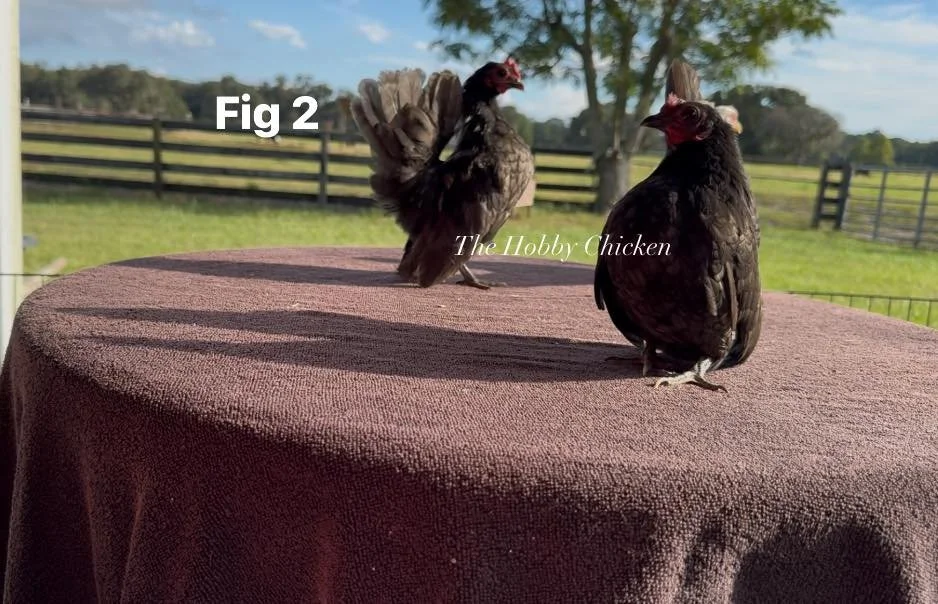
Figure 2: The female on the left has a squirrel tail. See how the base of her tail grows toward her head? This is undesirable.
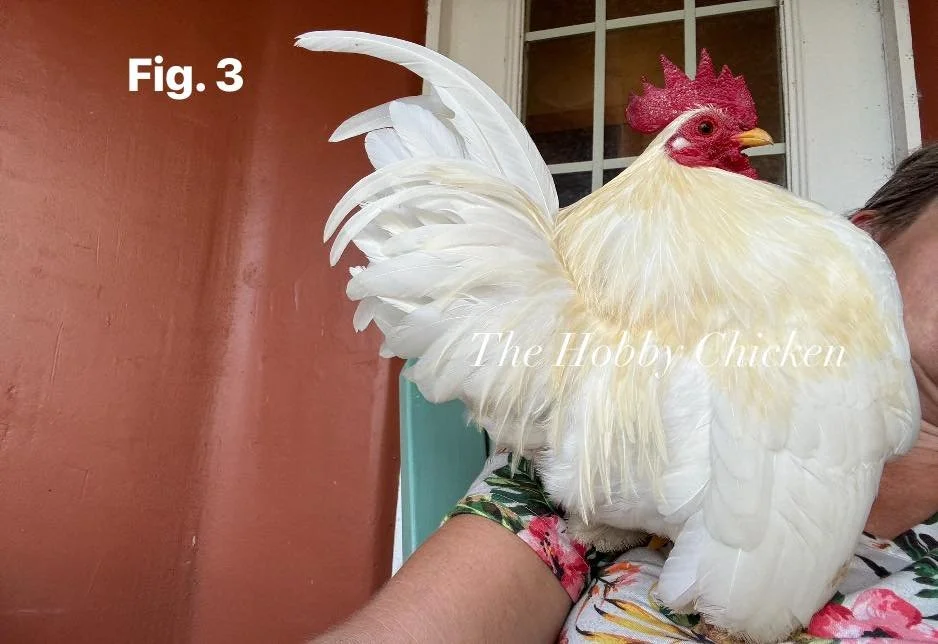
Figure 3: This male’s sickle feathers are a bit too curved. I’d like to see just a bit less curve. They aren’t horrible, but they could definitely be better. His tail also isn’t as full as I’d like; it looks somewhat disproportionate to his body.

Figure 4: This male has a nice curve to his tail feathers. We don’t want them straight as a board — a slight curve is ideal.

Figure 5: This male has a very nicely upright tail. His sickle feather is straight as an arrow, and he has a nice spread of feathers from the top sickle all the way down to the last feather.

Figure 6: This male is frizzled, which causes his tail feathers to curl a bit. Sometimes they can even curve toward the head. When that happens, it isn’t necessarily squirrel tail.
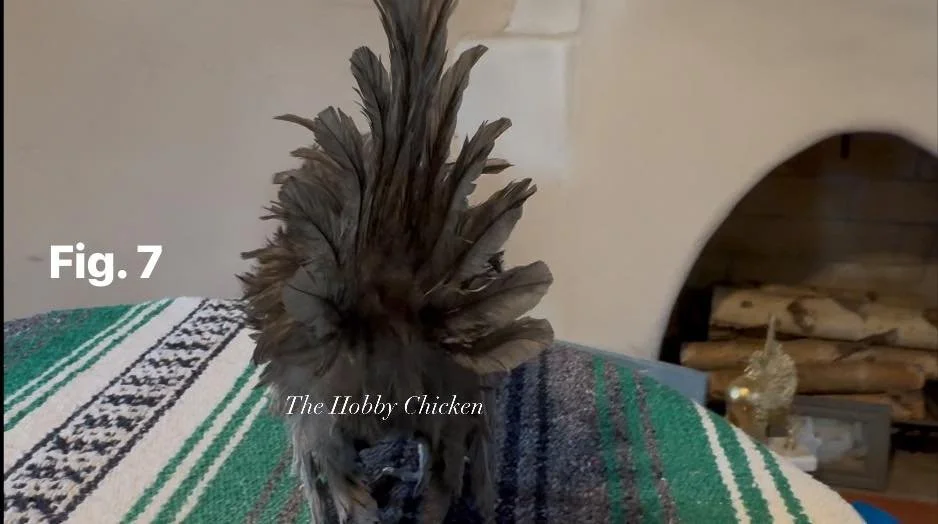
Figure 7: This young male has a very nice A-frame-shaped tail when viewed from behind. This is what you want to see on both males and females.

Figure 8: These ladies are sporting some lovely A-frame tails. The second from the right is especially nice.
Check out the other articles in the Serama Series:

Serama Series 3 - Wings
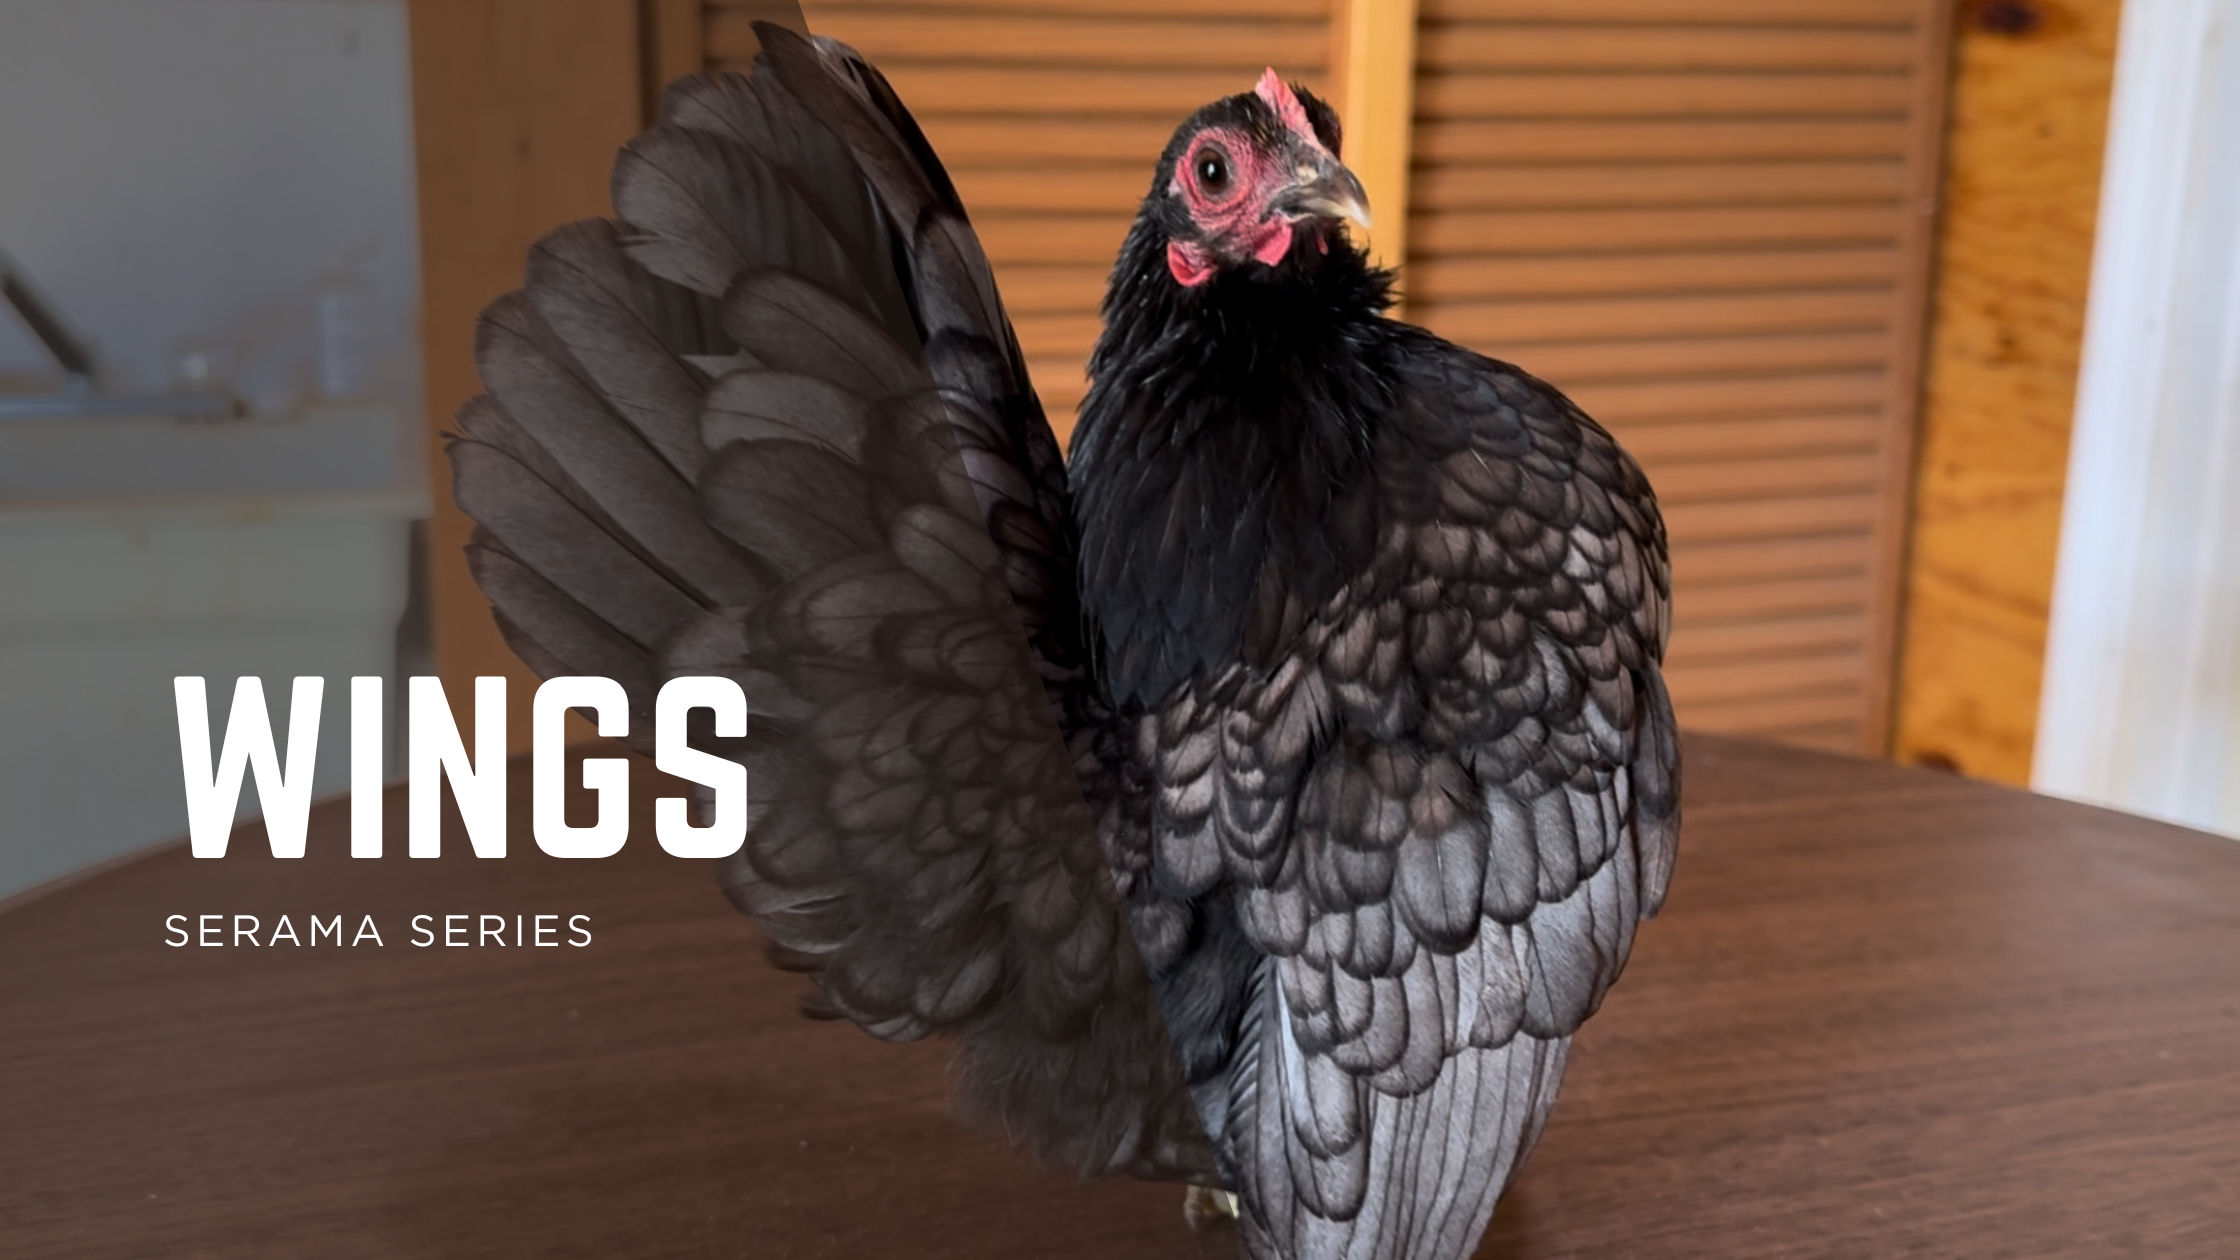
In this installment of our Serama series, we’re going to discuss wings and wing carriage. Serama are one of the few breeds required to carry their wings in a completely vertical manner. Most other breeds hold their wings in a more horizontal fashion, or close to it.
First and foremost, the standard calls for the wing, eye, and leg to fall on the same vertical line. In other words, if you were to draw a line from the top of the bird straight down through the eye, it should also run through the wing and leg. Be aware that some American and Traditional Serama carry their wings too far forward. If the wing is placed ahead of the leg, they can be docked points. While this forward placement is a desirable trait in the Ayam (which we’ll cover later in the series), it is not correct for the Traditional or American Serama.
Secondly, the wings of a Traditional or American Serama should nearly touch the ground. A good landmark is that the wing should be long enough to reach the outside toe, but not so long that it drags the ground when the bird is in pose. Keep in mind that when a male courts a female, he will drag his wings across the ground during his dance. That does not count as being “too long.”
A fault that can occur in Serama is scissor wing. It’s important to distinguish between “scissor wing” and “split wing.” Split wing occurs when a feather is missing as it didn’t develop, leaving a gap between the primary and secondary feathers. Scissor wing, on the other hand, happens when the primary feathers angle too far back, sticking out behind the secondaries.
There are two schools of thought about scissor wing. One suggests it is environmental—that keeping birds in cages where they cannot fly weakens their wings, leading to the condition.
The second school of thought, which I personally subscribe to, is that it is genetic. I’ve raised Serama the same way for years, in large horse stalls or similarly sized coops where they are able to fly freely from the time their feathers develop. Despite equal conditions, some birds develop scissor wing and some don’t. If it were purely environmental, none would have it. Can I prove that beyond a shadow of a doubt? No. But I’ve seen enough to convince me it is genetic.
Either way, scissor wing is something serious breeders strive to eliminate from their bloodlines. Many breeders say it isn’t worth worrying about, but as a perfectionist, I aim to go above and beyond.
In the examples below, I’ll show you birds whose wings are the correct length and angle, as well as some that are not.

Figure 1: Miss Bell is angled slightly toward the camera here, so you don’t see her in full profile. If you did, you would notice her eye, wing, and leg all in line. The length is harder to judge in this photo (due to my poor photography skills), but you can see that she does not have scissor wing.

Figure 2: This young lady has her wings too far back. Granted she isn’t standing up straight, evidenced by her legs angling back, but it’s a good representation of wings that aren’t in the correct position. If you drew a line from her eye straight down nothing lines up. There is no scissor wing.

Figure 2b: Here are some guiding lines for that photo. Red line lines up the eye. No wing or leg to be found along that line. Purple line is the angle of wing and the green line is the leg. Everything should be in line with the red line and it isn’t.

Figure 3: This young male is in pose but he too has too short of legs. Another 1/4 inch or so would be perfect. He has zero scissor wing.

Figure 4: Bruiser here is posing almost perfectly. His eye, wing and leg line up well. He is angled away from the camera just a touch. You can see a little bit of scissor wing at the bottom.

Figure 4b: Reference lines added. Green circle highlights the scissor wing. He’s angled away from the camera just a touch but the eye wing and leg align with the red line.

Figure 5: This young male has scissor wing and his wings are too short and they are ever so slightly too far forward.

Figure 5b: Reference lines added. His wing is a touch too far forward, indicated with the red line. The green circle highlights the scissor wing.

Figure 6: this male was raised the same way and has zero scissor wing. However his wings are a touch too long. You can see where the feathers are actually bent at the end due to them being too long. The question is, should his legs be longer or wings shorter?

Figure 7: Though this young male is posing his wing is completely vertical his wing is too short. He’s got about a half inch or more before his wing is long enough. This is undesirable. You can see scissor wing, circled. For me this makes him pet quality.
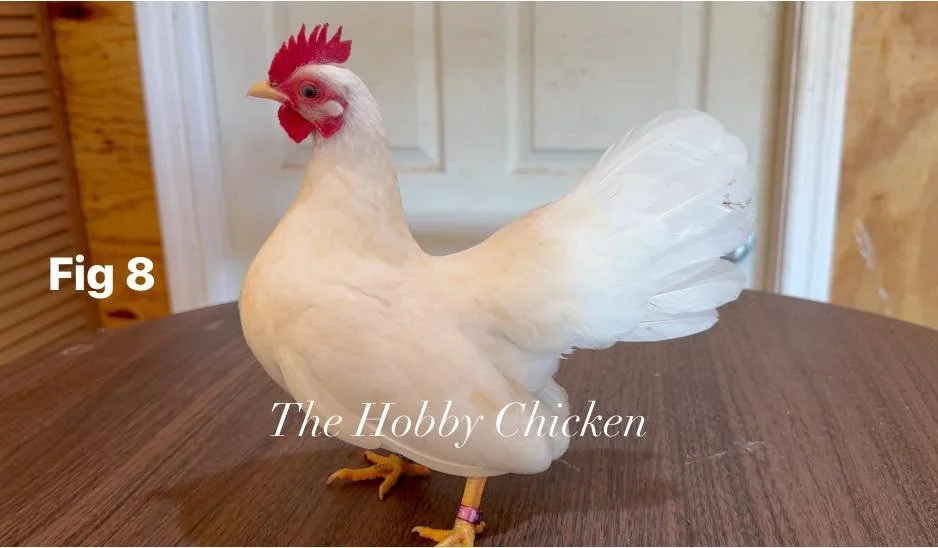
Figure 8: This pullet has her wings way too far back and she can’t get them forward due to her very poor conformation.

Figure 8b: Reference lines added. Nothing comes close to lining up, even with the slight angle on the photo.
Check out the other articles in the Serama Series:

Serama Series 2 - Shape

Continuing the Serama series, I’d like to include an excerpt that applies when evaluating Serama—or any other breed of animal. “Shape makes the breed…” If the shape is not there, neither is the breed.
This time, we’re focusing on the back in relation to the tail and the base of the neck. A Serama is a very upright breed, and in order to achieve that stance, it must have a short back. With a longer back, the bird takes on a more horizontal appearance.

Figure 1: This pullet resembles an Old English Game Bantam more than a Serama. She has a very long back, the tail angle is incorrect, and when asked to stand upright, she simply can’t. Remember: “Shape makes the breed.” This is not a Serama—it’s a bantam.

Figure 2: This pullet shows the short back that defines a Traditional or American Serama. She stands vertically, with no space between her tail and the base of her neck.

Figure 3: A pullet with a very nice tail, though her back is just a bit too long.
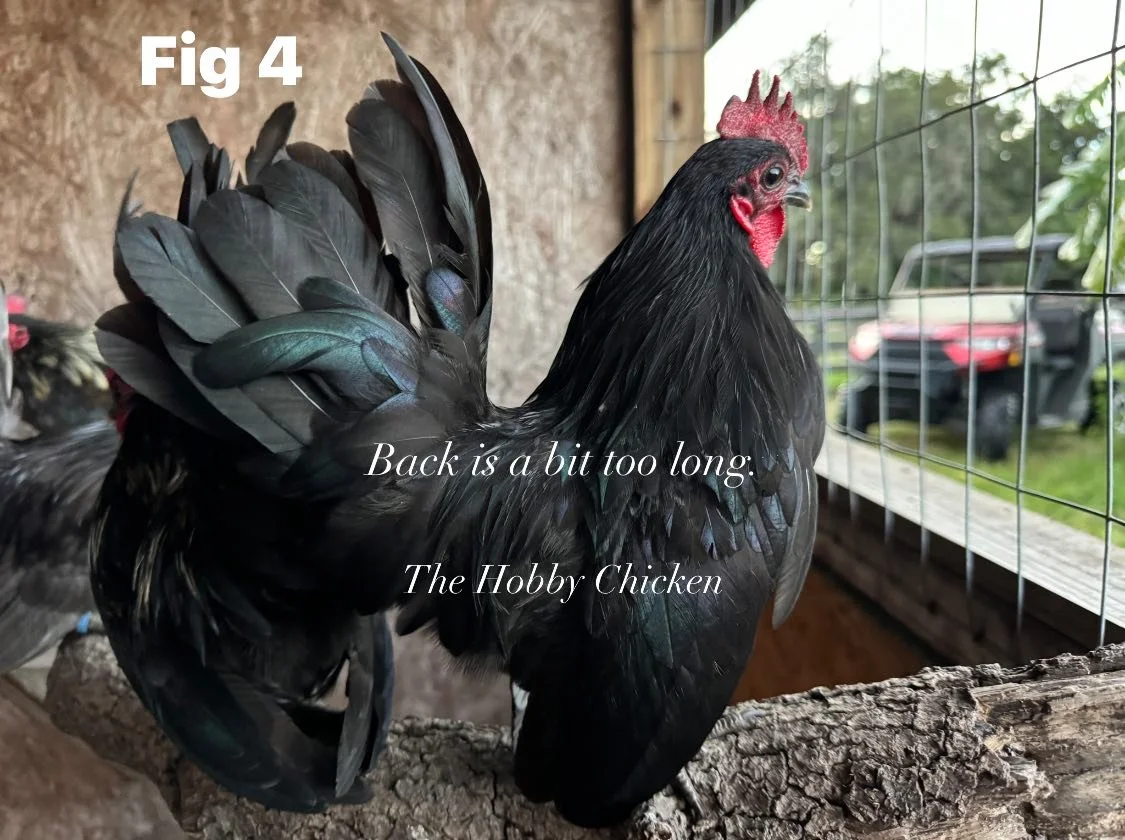
Figure 4: A cockerel with too long of a back. That back will never shorten.
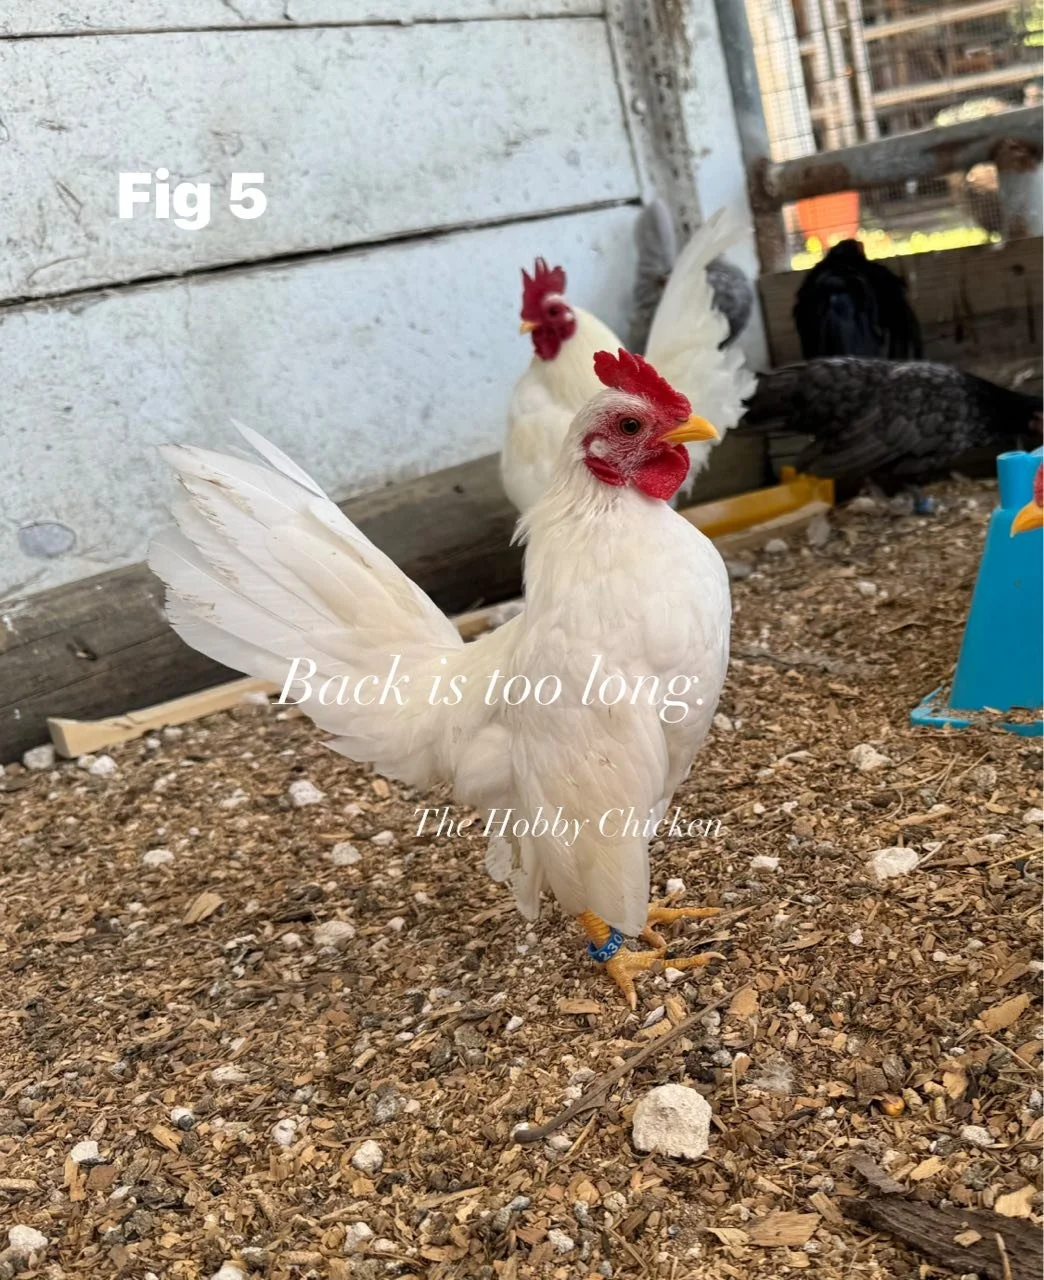
Figure 5: Another cockerel with a back that is far too long.
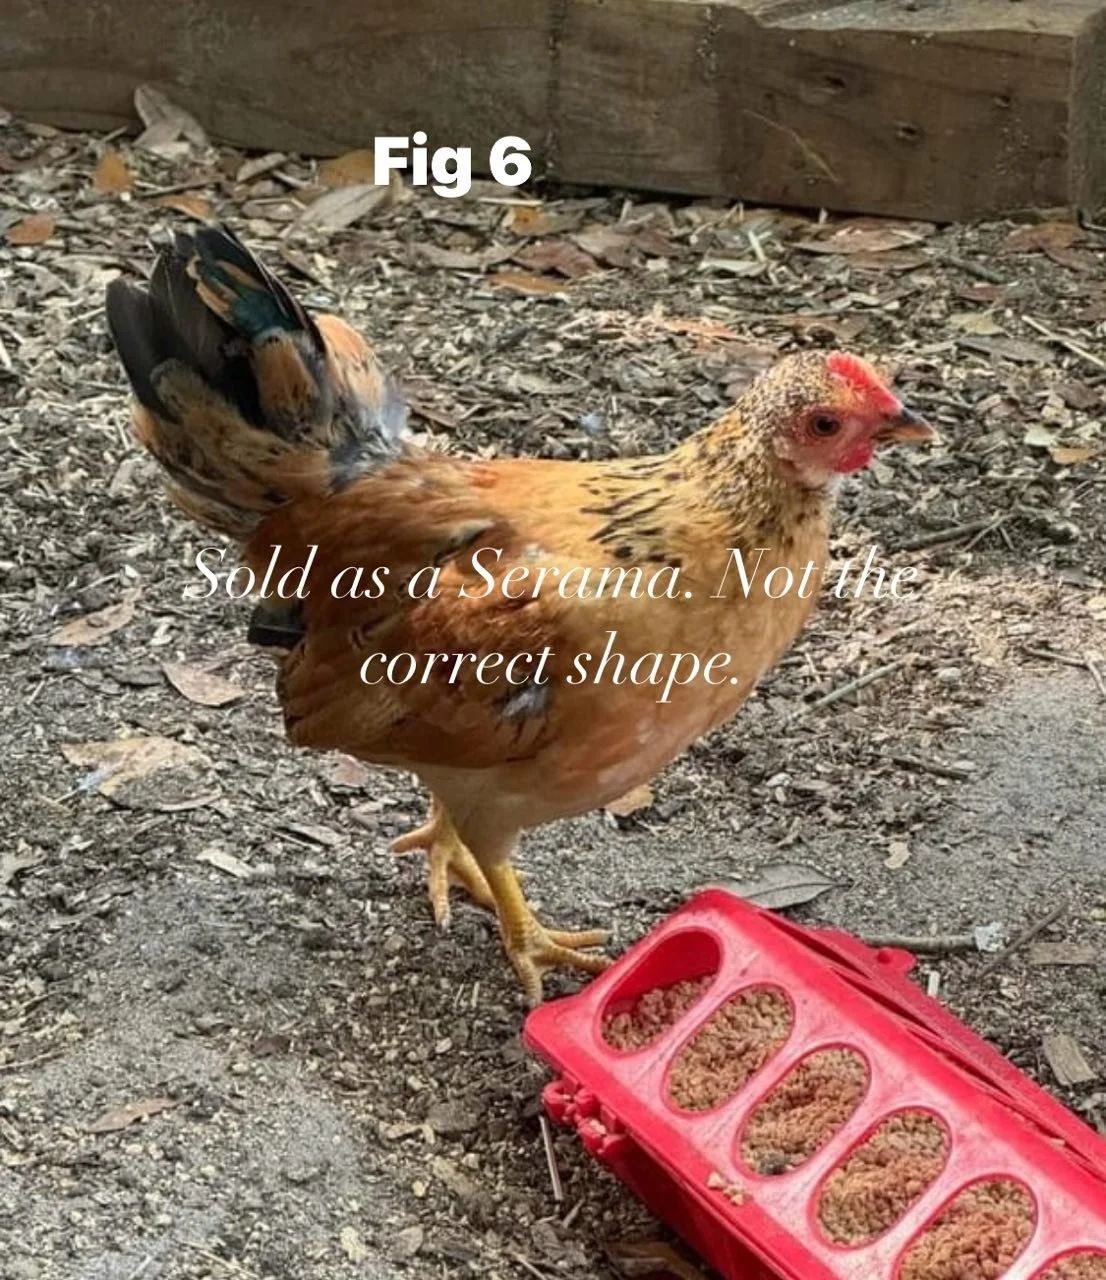
Figure 6: A bird that was sold as a Serama but does not have the correct shape.

Figure 7: This cockerel has an extremely long back—far beyond what is acceptable. No amount of development will fix that. Again, this is a bantam, not a Serama.

Figure 8: A young chick already showing the proper Serama shape. This little male has gone on to ribbon many times.

Figure 9: A cockerel that was sold as “breeder quality”but his back is very long and he lacks the correct shape.

Figure 10: This is the ideal American or Traditional male—short back, upright stance, and everything in correct proportion.
Check out the other articles in the Serama Series:

Serama Series 1 - Combs and Wattles

HERE WE GO!! The first in a series of articles about Serama. We’ll go from the top of the head to the feet, section by section.
Let me start this series by saying it’s well worth the investment to get an ABA (American Bantam Association) and/or an APA (American Poultry Association) Standard of Perfection book. Both are packed with information, not just about Serama, but also about color standards, scoring systems, and more. I’ll be referencing pages from them as we go along. The SCNA (Serama Council of North America) follows the same defects and disqualifications listed by the ABA and APA. The main difference is that the SCNA also does tabletop showing. Tabletop showing, and its scoring system, are unique. In tabletop showing, there are no color requirements, while color is very important in cage shows under an ABA or APA judge, like at a 4-H show or a State Fair.
The first things to look at is the same for every type of Serama: the comb and wattles Since Serama only have a single comb, it should be medium in size, straight, and standing upright—not flopped over like you might see in other breeds. A proper comb should have five points. In cage shows, the comb can earn up to 5 points. (See page 49 in the 45th Edition of the APA American Standard of Perfection or page 22 in the 2020 ABA Bantam Standard.)
The wattles should be medium and round for males while females should be small and round.
Keep in mind, though, that each judge sees things a little differently. What looks like a medium comb to one judge might seem too big to another. At the end of the day, when you take a bird to a show, you’re paying for that judge’s opinion. If you show under two different judges, don’t be surprised if you end up with two very different sets of scores.
Below are some photos showing examples of good combs as well as combs with defects or disqualifications:

Figure 1: This male has a large comb (which is a defect) and it flops over which may qualify as a DQ. At the very least it is a big defect. Refer to the American Poultry Association 45th Edition Standard of Perfection page 37. This is not a bird that I would keep in the breeding pen. You don’t want a flopped comb for males or females.

Figure 2: This male has a nice sized comb. He’s a cockerel still and it could grow larger but hopefully not too much so.

Figure 3: This guy has a nicely sized comb. He also has 5 points which is how many a Serama should have. In my opinion his wattles are a bit bigger than I like.

Figure 4: The little lady on the right has a bit bigger comb than I like. As are her wattles. The shape is good but the size is a large. Females should have small combs and wattles. The little lady on the left has a comb and wattles that are just about right.

Figure 5: This male has a nice sized comb and his points are nicely spaced out. Any larger and his comb would be too big, in my opinion. His wattles are appropriately sized.

Figure 6: This little girl’s comb and wattles are perfect. Nice and small as they should be.

Figure 7: This guy’s comb is a little funky. The shape is not very symmetrical. He’ll likely lose a point or two on his comb score. It’s medium sized and is standing upright but it’s not the perfect comb.

Figure 8: This boy is not a Serama however he is a Single Comb breed and he has a problem. See that “point” that sticks out to the side? That is called a side sprig. That is an instant DQ. You don’t want that in your breeding pen.
There are some other terms you may hear:
Thumb mark: I have yet to find a photo of what a thumb mark looks like in a single comb. Reportedly it looks like you pressed your thumb in the center of the comb and made an indention.
Crow headed: This is basically a chicken whose head shape is elongated like that of a crow. Imagine taking the beak of a Serama and pulling it forward drawing out the head a bit.

The Curious Case of Fairy Eggs
It was like any other day on the farm. The sun was starting to set as I walked around the barn for the evening chores. It had been two days since I gathered eggs and after stopping at the Orpingtons and Legbars, the Serama coops were up next.
Walking down the row my basket continued to fill up. I stopped in my tracks after taking a step to the next coop.
What was this I was seeing? Yes, Serama eggs are smaller than full size chickens, but this was something different. A third of the normal size, it looked like an egg. Or was it?
Tracing the Clues
To solve our mystery, it’s important to understand the normal egg formation process—and where it sometimes goes wrong.
In a typical chicken, egg production starts with the development of a yolk in the ovary, which is then released into the oviduct. After that the yolk is coated with albumin (egg white), shell membranes and then the egg shell is formed.
In young pullets, the synchronization between the ovary and oviduct isn’t perfect. When this coordination fails, the resulting egg may lack sufficient yolk. While a standard egg displays a balanced composition of yolk and albumen, these eggs are noticeably smaller and can appear almost “empty.” These “mistakes” are common during the first few laying cycles, as the pullet’s reproductive system is still in its learning phase.

A Promising Lead
What I was looking at wasn’t something supernatural. It was definitely an egg, just a lot smaller and not left by garden gnomes. Sometimes referred to as fairy or wind (fart) eggs, they are much smaller and are usually yolkless (or pretty close to it).
Fairy eggs are not the products of magical mischief but are a natural occurrence seen in the early laying cycles of pullets. In the past they were often considered a bad omen for your flock. Modern poultry science has shown they’re simply a developmental hiccup, not a harbinger of misfortune.
Examining the Evidence
Interestingly, the presence of fairy eggs is more a sign of growth than doom.
Fairy eggs are predominantly laid by young pullets whose reproductive systems are still maturing. Their occurrence is a natural part of their maturity and often decline after the pullet’s first few weeks of laying.
As they continue to mature, the number of fairy eggs decreases. Mature hens almost always produce well-formed, full-sized eggs, making fairy eggs a rarity for them.
Spotting a fairy egg now and then in a new flock is normal and a fun novelty you could enter in the next poultry show’s smallest egg contest. Rather than a sign of a problem, these eggs serve as an indication that our pullets are starting the egg laying stage of their development.
Case Closed
Discovering a fairy egg shouldn’t make you worry. Occasional appearances are normal and tend to resolve as the pullets mature.
If fairy eggs begin appearing frequently or in older hens, it might be worth checking things such as diet, lighting, or stress levels in the flock. Some underlying health issues or environmental stresses can sometimes contribute to reproductive glitches.
While fairy eggs are generally safe to eat, their nutritional value might be lower than that of a fully developed egg. Of course your next omelette would require a lot of fairy eggs by comparison.
Keeping an eye on the overall flock health and making sure their food, water and environment are in top shape can help prevent potential health issues and make finding your next fairy egg a fun reward of backyard chicken keeping.

Eggs or Dinner? How to Avoid the Biggest Backyard Chicken Blunder
It’s grocery time and you find yourself staring at the egg shelf, shocked by how much a carton costs.
“I can do better! I’ll get my own chickens!!”
One trip to the farm store and a dozen fuzzy chicks later, you can already taste those glorious, home-laid omelets.
A few weeks later they are eating everything in sight and look more like bodybuilders than cute egg-layers. Your dreams of fresh eggs every morning just flew out the window. These aren’t future egg machines. They’re destined for the dinner plate.
What went wrong and how can you avoid this in the future?
Know your purpose and the right breed follows
The most important place to start when you want to have backyard chickens is to know what your goal is. Do you want a regular basket of fresh eggs? Do you want birds that are ideal for the oven? There are a lot of different breeds out there, and each has characteristics that make them great layers or the perfect roasting size.
If you primarily want fresh eggs, focus on layer breeds (e.g., Rhode Island Reds, Leghorns). If you want meat, choose a meat breed (e.g., Cornish Cross, Freedom Ranger or Buckeye).
There are additional breeds if you think you might be interested in both eggs and meat eventually. Certain breeds (e.g., Orpingtons, Plymouth Rocks) can provide decent egg production and meat. However, they won’t excel at either one as specialized layers or meat birds.
Newcomers often rush and pick up the first cute chicks they see without checking if those birds will actually lay well or are the right size for their coop. Take some time to do a little research on these potential breeds. Read quick online summaries or talk to other farms or enthusiasts about each breed’s size, temperament, egg-laying frequency, and hardiness.
Avoiding common mistakes when selecting chicks
Now you’re off to the farm store!
Chicks often look similar when their first hatch, and busy feed stores might mix up labels. Double-check the bins, ask questions, and confirm the breed with store staff. Don’t rely on generic “pullets” labeling if you want to be sure they’re layers. Make sure you are getting pullets or you’ll find yourself with a future chorus of rooster crows to go with your morning coffee.
New chicken owners get excited and sometimes purchase more chicks than they have space or resources for. Start small with a few layers you can manage comfortably. You can always expand your flock later if you have the room.
A quick reminder too that some areas have restrictions on backyard chickens or roosters. It’s always best to avoid trouble by reviewing local ordinances first—this can also help you decide on which (and how many) layer breeds to get.
Starting them off right
Happy, healthy birds will give you the most eggs year after year, so once they’ve graduated and are large enough to be out in the coop it’s important to make sure things are setup for success.
Layers need comfortable nesting boxes, adequate space to roam, and proper perches. A cramped coop leads to stress and fewer eggs. Aim for at least three square feet per chicken inside the coop and a safe, fenced yard for daytime roaming.
Unlike meat birds that need very high protein to grow quickly, layers thrive on a balanced layer feed with added calcium. Make sure you have a reliable source of feed, as nutrition directly impacts egg quantity and quality. Definitely don’t forget a regular supply of clean water.
Don’t under estimate the time commitments involved with backyard chickens. Plan for daily egg collection, coop cleaning, and regular health checks. Layers live longer than meat birds, so be prepared for an ongoing and rewarding relationship that can last several years.

Hard-Boiled Myth: Hens Can’t Grow Spurs

Several months after we got our first Legbars on the farm we noticed sharp growths on the legs of one of them. She was growing spurs! The myth that only roosters grow spurs has left many backyard enthusiasts scratching their heads when the spurs start to grow. Here’s the truth: hens can grow spurs, and it’s normal. Here are 4 reasons why hens can grow spurs:
1. Some breeds are more prone to spur growth
Certain breeds, like Leghorn, Minorca, Sicilian Buttercup, Polish hens, and game breed hens, are more prone to growing spurs. If your flock includes these breeds, don’t be surprised to spot a hen with spurs.

2. Development can occur as hens age
Like people, hormonal shifts happen as a hen ages. Older or dominant hens may show signs of spur growth.
3. Genetics
Hens have spur buds. These are bony protrusions on a chicken’s legs, covered in keratin, and their size can vary. Like feather patterns or egg colors, spur growth can be influenced by a hen’s genetic makeup. If her ancestors had spurs, she might too.
4. Dominance in the Pecking Order
If your flock doesn’t have a rooster, a dominant hen may take on some male traits, including growing spurs. This doesn’t mean your hen is turning into a rooster, even though she may show dominant behaviors.

How to Care for Hens with Spurs
Spurs on hens don’t usually cause issues, but there are some basic things to consider:
Watch their Growth: Long spurs can interfere with walking or scratch other chickens. In some instances they can curl and grow into the leg.
Trim When Needed: Use a file or spur trimmer to safely shorten spurs. Always sanitize tools to avoid infections.
Watch for Injuries: Spurs can sometimes lead to self-inflicted injuries or scratches during roosting. Keep an eye out for wounds.
Consult an Expert: If unsure, ask a vet or experienced chicken keeper for guidance.

Why Are My Rooster’s Legs Red?

A new chicken enthusiast contacted me about her rooster. She noticed his legs were more red than usual. At first, she thought it might be an infection or a reaction to something he ate. After chatting with her it turns out his red legs were perfectly natural—and even a sign of his health and maturity.
If you’ve ever wondered what is going on, you’re not alone. It’s not uncommon to wonder if this is something serious or another quirk of chicken keeping. Here are 4 common reasons why your rooster’s legs are red:
1. Hormonal Changes During Maturity
Roosters experience hormonal surges as they reach sexual maturity or during the breeding season. These hormonal changes increase blood flow, causing their legs to appear redder than usual. Think of it as nature’s way of making them more attractive to hens.
2. Increased Circulation During Mating Season
Red legs often coincide with a rooster’s more active behavior: crowing, strutting, and general showing off. This is most prominent in spring and summer when chickens’ reproductive cycles are in full swing. You might see this redness increase in the mornings and early evenings when they are generally more active with the females.
3. Health-Related Factors
While red legs are often natural, they can also indicate issues like:
- Infections: Look for swelling, lameness, or heat around the legs.
- Mites or Scaly Leg: Check for crusty, raised scales that might point to an infestation.
4. Breed-Specific Traits
Some breeds, such as Rhode Island Reds or Leghorns, naturally exhibit more pigmentation, including red or orange legs.
Do I need to do anything?
No treatment is necessary if the redness is due to hormonal changes. If your rooster is active, eating well, and behaving normally, red legs are likely hormonal. Just keep an eye out for other symptoms. Watch for signs of discomfort, limping, or unusual behavior that might indicate a health issue. It’s a good idea to visually inspect them regularly for signs of mites or cuts.
Can Hens Get Red Legs Too?
While it’s less common, hormonal changes in hens can cause slight redness. However, significant redness is usually a rooster-specific trait.
What If the Redness Doesn’t Go Away?
Prolonged redness without other symptoms is often harmless. If you notice persistent swelling, pain, or lameness it’s worth looking closer or consulting a professional.

Knowledge is Power

As the saying goes, “Knowledge is power.”
Fred P. Jeffrey, in his book Bantam Breeding and Genetics, wisely observed: “Much nonsense has been written on the subject of breeding. There are no trade secrets worth worrying about. A knowledge of genetics is not required but it helps to make things more interesting by allowing one to differentiate between the outright charlatan, the ignorant but well-meaning, and the real breeder. It is usually true that those with the greatest knowledge of genetics make the least extravagant claims when advertising their product.”
Before purchasing any animal—whether it’s a bird, dog, cat, horse, or cow—do your own research. Understand the breed’s standard appearance and characteristics. This will help you identify a breeder whose goal is to improve the breed and help others succeed, rather than maximize profit. There are breeders out there who genuinely care about these values, and I’ve been fortunate to find them.
Trust your instincts. If you feel pressured to make a purchase, you probably are. Never let someone “surprise” you by choosing animals for you. Insist on photos, and preferably videos, of the birds being offered. If the birds don’t meet your expectations, politely decline by saying, “Thank you. Those aren’t exactly what I’m looking for, but I appreciate your time.”
I once heard a statement on the radio that resonated with me: “You didn’t get taken advantage of—you purchased before you educated yourself.” Before investing in birds, invest in your own education to protect yourself. Consider purchasing a Standard of Perfection from the American Bantam Association or the American Poultry Association, and study the examples they provide. If a bird’s high price doesn’t align with the breed standards, it’s best to move on.
Common Anecdotes
Recently, someone reached out to me for advice about the birds they had purchased. They said, “He’s such a cutie and a very sweet guy, but I’m sad that I was taken advantage of paying premium dollar… I guess I had to start somewhere, but it’s a painful way to learn.”
This story is common among both parents of 4-H kids and adults new to breeding or showing. Many people interested in Serama start looking for a mentor and a good source of birds but often don’t know where to begin. They may be drawn in by a flashy advertisement or a raffle promoting “Award-Winning,” “Pure Malaysian,” or “Teacup Chickens,” complete with a colorful array of emojis. Unfortunately, newcomers are frequently targeted by sellers looking to make a quick profit.
These flashy ads often belong to people who measure success by their revenue rather than breed standards. The “award-winning” birds they’re promoting may have won a ribbon simply because they were the only birds of that breed at a small show—not because they met high standards. A safer option to purchase is at a show where you have access to judges that can assess a bird you are interested in. Better yet, help out and clerk. You’ll learn a tremendous amount about the breed from that experience!
Remember, you have control over your purchases, your money, and your education. Use these to your advantage!

How to Assist a Shrink-Wrapped Chick: A Step-by-Step Guide

Shrink-wrapped chicks—if you’ve been hatching eggs long enough, you’ve likely run into this tricky situation. If not, consider yourself lucky…for now! Shrink-wrapping happens when a chick’s membrane dries out and sticks to them during the hatching process, making it nearly impossible for them to hatch on their own. In this guide, we’ll walk through how to safely assist a shrink-wrapped chick and avoid unnecessary complications. Trust me, it’s all about being gentle and knowing when to stop.
What Is Shrink-Wrapping?
Simply put, shrink-wrapping occurs when the inner membrane of the egg, which should stay soft and pliable, dries out and tightens around the chick. This can happen if the humidity levels drop too low during the hatching process. It makes it almost impossible for the chick to move and break free, and if you don’t step in, things can take a turn for the worse.
How to Tell if a Chick Is Shrink-Wrapped
The first step is identifying whether your chick is actually shrink-wrapped or just taking its time to hatch. Look for a tight, white, or opaque membrane that seems to be glued to the chick. If the chick is pecking but not making much progress, and you can see the membrane stuck to its body, it’s time to intervene.
Tools You’ll Need

Before you jump in, gather these items:
• Hemostats or Tweezers: For gently cracking the shell.
• Q-tips: To moisten the membrane.
• Warm Water: Slightly warmer than room temperature, since it cools quickly.
• Optional: Ear Cleaner: Sounds odd, but it’s perfect for peeling back the membrane without causing damage.
Once you have everything ready, it’s time to help that little one out!
Step 1: Crack the Shell (Gently!)

You’ll want to start by cracking the egg shell carefully, preferably around the air cell where there’s already a natural gap. Use your hemostats or tweezers to gently pop the shell open. I personally prefer using hemostats because they offer a bit more control without squeezing too hard. Be super cautious—don’t puncture any blood vessels!
Step 2: Moisten the Membrane

Now that you’ve opened up part of the shell, it’s time to tackle the membrane. Dip a Q-tip into your warm water and lightly moisten the membrane. Don’t soak it! You want to soften it just enough to make it more flexible. And whatever you do, be mindful of the chick’s nostrils. Too much water, and you risk drowning the little guy.
If you spot bright red blood vessels, stop immediately! Wrap the chick in a damp paper towel and put it back in the incubator for a while longer. If no blood vessels are present, proceed to the next step.
Step 3: Peel Back the Membrane

Once the membrane is softened, you can begin peeling it back, little by little. Use the drier end of your Q-tip to gently pull at the edges. Keep an eye out for blood vessels, especially around the chick’s head and wings. If you spot any, stop and give it more time in the incubator.
Step 4: Let the Chick Struggle (But Not Too Much)

Here’s the important part: you’re not supposed to do all the work. Chicks need to struggle during hatching—it helps them absorb the egg yolk. You’re just assisting. Once you’ve freed the chick enough to give it some room, let it continue to push its way out. You’re there to help, not to rescue the entire process!
Step 5: Watch for That Umbilical Cord
Before you start cheering for a job well done, remember that chicks are still connected to the egg via a tiny umbilical cord. Pull too hard, and you risk tearing their intestines or rupturing their egg sac. Yikes, right? So be patient and let the chick finish the job when it’s ready.
Aftercare for Your Chick

Once the chick is out, it’s going to be tired. Like, really tired. Wrap it up in your hands to keep it warm, or place it back in the incubator if needed. Keep the humidity high to prevent further drying out, and let the chick rest.
Final Thoughts
Helping a shrink-wrapped chick can be a little intimidating the first time you try it, but it’s totally manageable with the right tools and a bit of patience. Just remember—be gentle, watch for blood vessels, and let the chick do most of the work. With practice, you’ll gain confidence, and your chicks will be healthier for it!
If you’d like to see a video of the process, I posted one on YouTube in The Hobby Chicken channel:

Should You Buy Eggs or Birds?
If you’re serious about getting into Serama breeding, you might have heard the advice to purchase birds rather than eggs. There are several reasons why buying birds is often the better choice, especially if you want to get the most bang for you buck.
Why Buying Birds Is Recommended
It’s not uncommon for people to purchase birds with the sole intention of selling their eggs. Some may buy a bird or pair and, within days, start advertising hatching eggs from those birds. However, this practice raises concerns. In such a short time, there’s no opportunity to test hatch the eggs or ensure that the offspring will meet the breed standard of perfection (SOP) when they mature. Additionally, there’s no guarantee that the eggs will even hatch.
Many buyers have found themselves disappointed after purchasing hatching eggs, only to discover that the chicks were not the color or type they were seeking or, in some cases, not even the right breed! This results in wasted time and money. If you’re looking for a specific type or color of Serama, it’s advisable to buy mature birds rather than eggs.
The Benefits of Buying Mature Birds
When you purchase mature or nearly mature birds, you have a much clearer idea of what the offspring might look like. For example, if you’re interested in American Serama, the birds must meet specific color requirements. Birds with color leakage or the wrong leg color are disqualified. It takes about 6-8 months for a Serama to reach a stage where you can get an idea if they are going to have the qualities you are looking for. If you buy eggs and hatch them, you might wait 7-10 months before knowing what you have. If you find that you don’t have any of what you were looking for you have to start completely over or use what you have a spend years trying to get them to SOP.
While you might occasionally find a breeder willing to show you the parent birds, this is a rare opportunity. When buying from platforms like eBay, Etsy, or Facebook, you are at the mercy of the seller and can only hope they’re providing what you’re looking for. Owning your birds allows you to hatch as many eggs as they produce, ultimately saving time and money.
The Challenges of Shipping Eggs
Another reason to prefer birds over eggs is the difficulty of shipping eggs. No matter the breed, shipping can be hard on eggs. Boxes are often bounced, tossed, rattled, and shaken during transport, which can dislodge the air cell inside the egg. This often renders the egg unhatchable, especially if you’re using a rolling-type incubator.
Due to these challenges, many serious breeders have stopped offering eggs altogether. Disgruntled buyers often take to social media to criticize breeders, claiming they received “infertile” eggs. Breeders decide, rightfully so, that it’s not worth their time and peace so they decline offering eggs at all.
When Buying Eggs Is Justified
Some buyers opt for eggs to mitigate the risk of transferring illnesses to their coops, which is entirely understandable. In such cases, it’s crucial to do your homework. Research, study, and keep an eye on social media platforms like Facebook. You can easily spot breeders who are serious about their craft—those who have test hatched and raised offspring to maturity before offering eggs for sale.
A Final Word of Advice
If you decide to purchase eggs, always ask for current videos of the parent birds. If the seller cannot or will not provide these, it’s wise to politely decline. This precaution can protect you from scammers who may have stolen photos or are selling eggs from deceased birds—situations where you obviously can’t expect viable offspring.

Serama vs Old English Game Bantam
One of the breeds of bird most often mistaken for a Serama is the Old English Game Bantam, or OEGB. The differences between the two breed standards are quite vast. In this article, we’ll look at those differences so you can identify them and be more informed when purchasing a Serama.
Longtime breeders of exhibition OEGB, John Harvey and Alycia Harvey, were gracious enough to send me photos of well-bred OEGB. We’ll be comparing those photos with photos of well-bred Serama, both males and females, that were also graciously sent by Lago Family Farm and Sherri Roy. I pulled pet quality Serama photos out of my own photo albums from years ago when I was first introduced to the Serama breed.

The first photo is of a female OEGB (Photo 1), owned and bred by John Harvey. Notice how her wings are at an angle well above her hocks (the joint between the scaly part of the legs and the “drumstick”). Her body follows that same angle. Her back is flat, and the shape between her neck, back, and tail creates a loose U. Her tail angle is about 45 degrees and her tail feathers are moderately spread, as they should be.

The silkied Serama in Photo 2 is owned and bred by Wilson Lago. Her wings are nearly perfectly vertical. The wings cover her legs and almost touch the ground. She has a nice tight back, and when her head is posed so her eyes are in line with her legs, the back of her head would almost touch her tail feathers. Her tail is also nice and vertical.
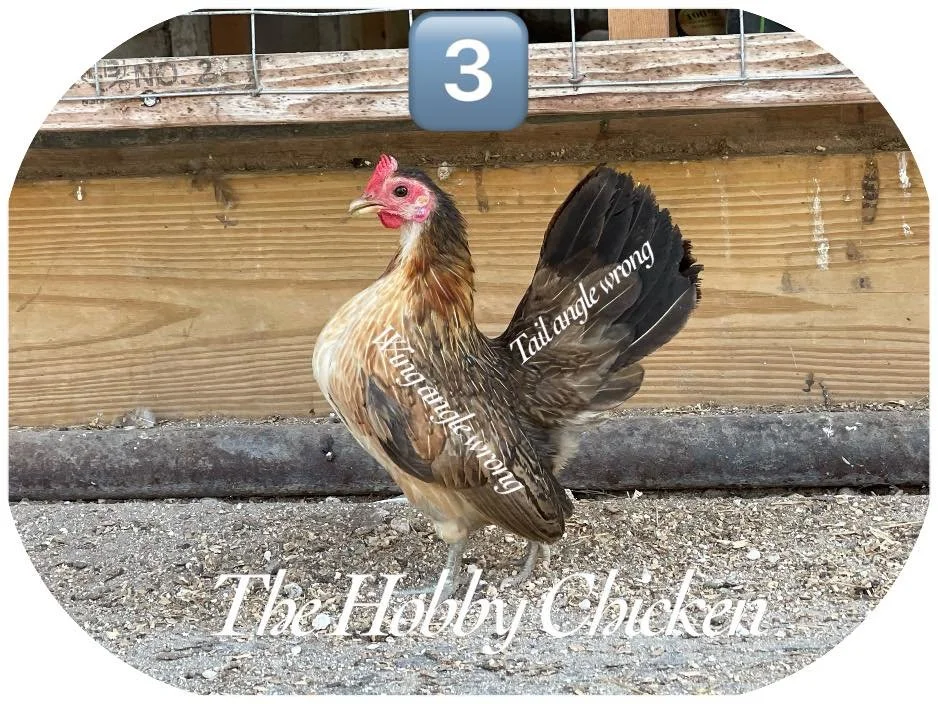
Photo 3 is one of the first Serama I ever purchased before I decided to get into showing them. This is a perfect example of a Serama that very much looks like an OEGB. The tail angle and the length of the back are wrong, suggesting she could very well be part OEGB.

In the photo of a male OEGB (Photo 4), owned and bred by John Harvey and Alycia Harvey, similar to the female, you can see the wings are tucked at an angle. The legs are completely exposed and not covered by the wings. The tail is at the same 45-degree angle with very long, flowing, curved sickle feathers.

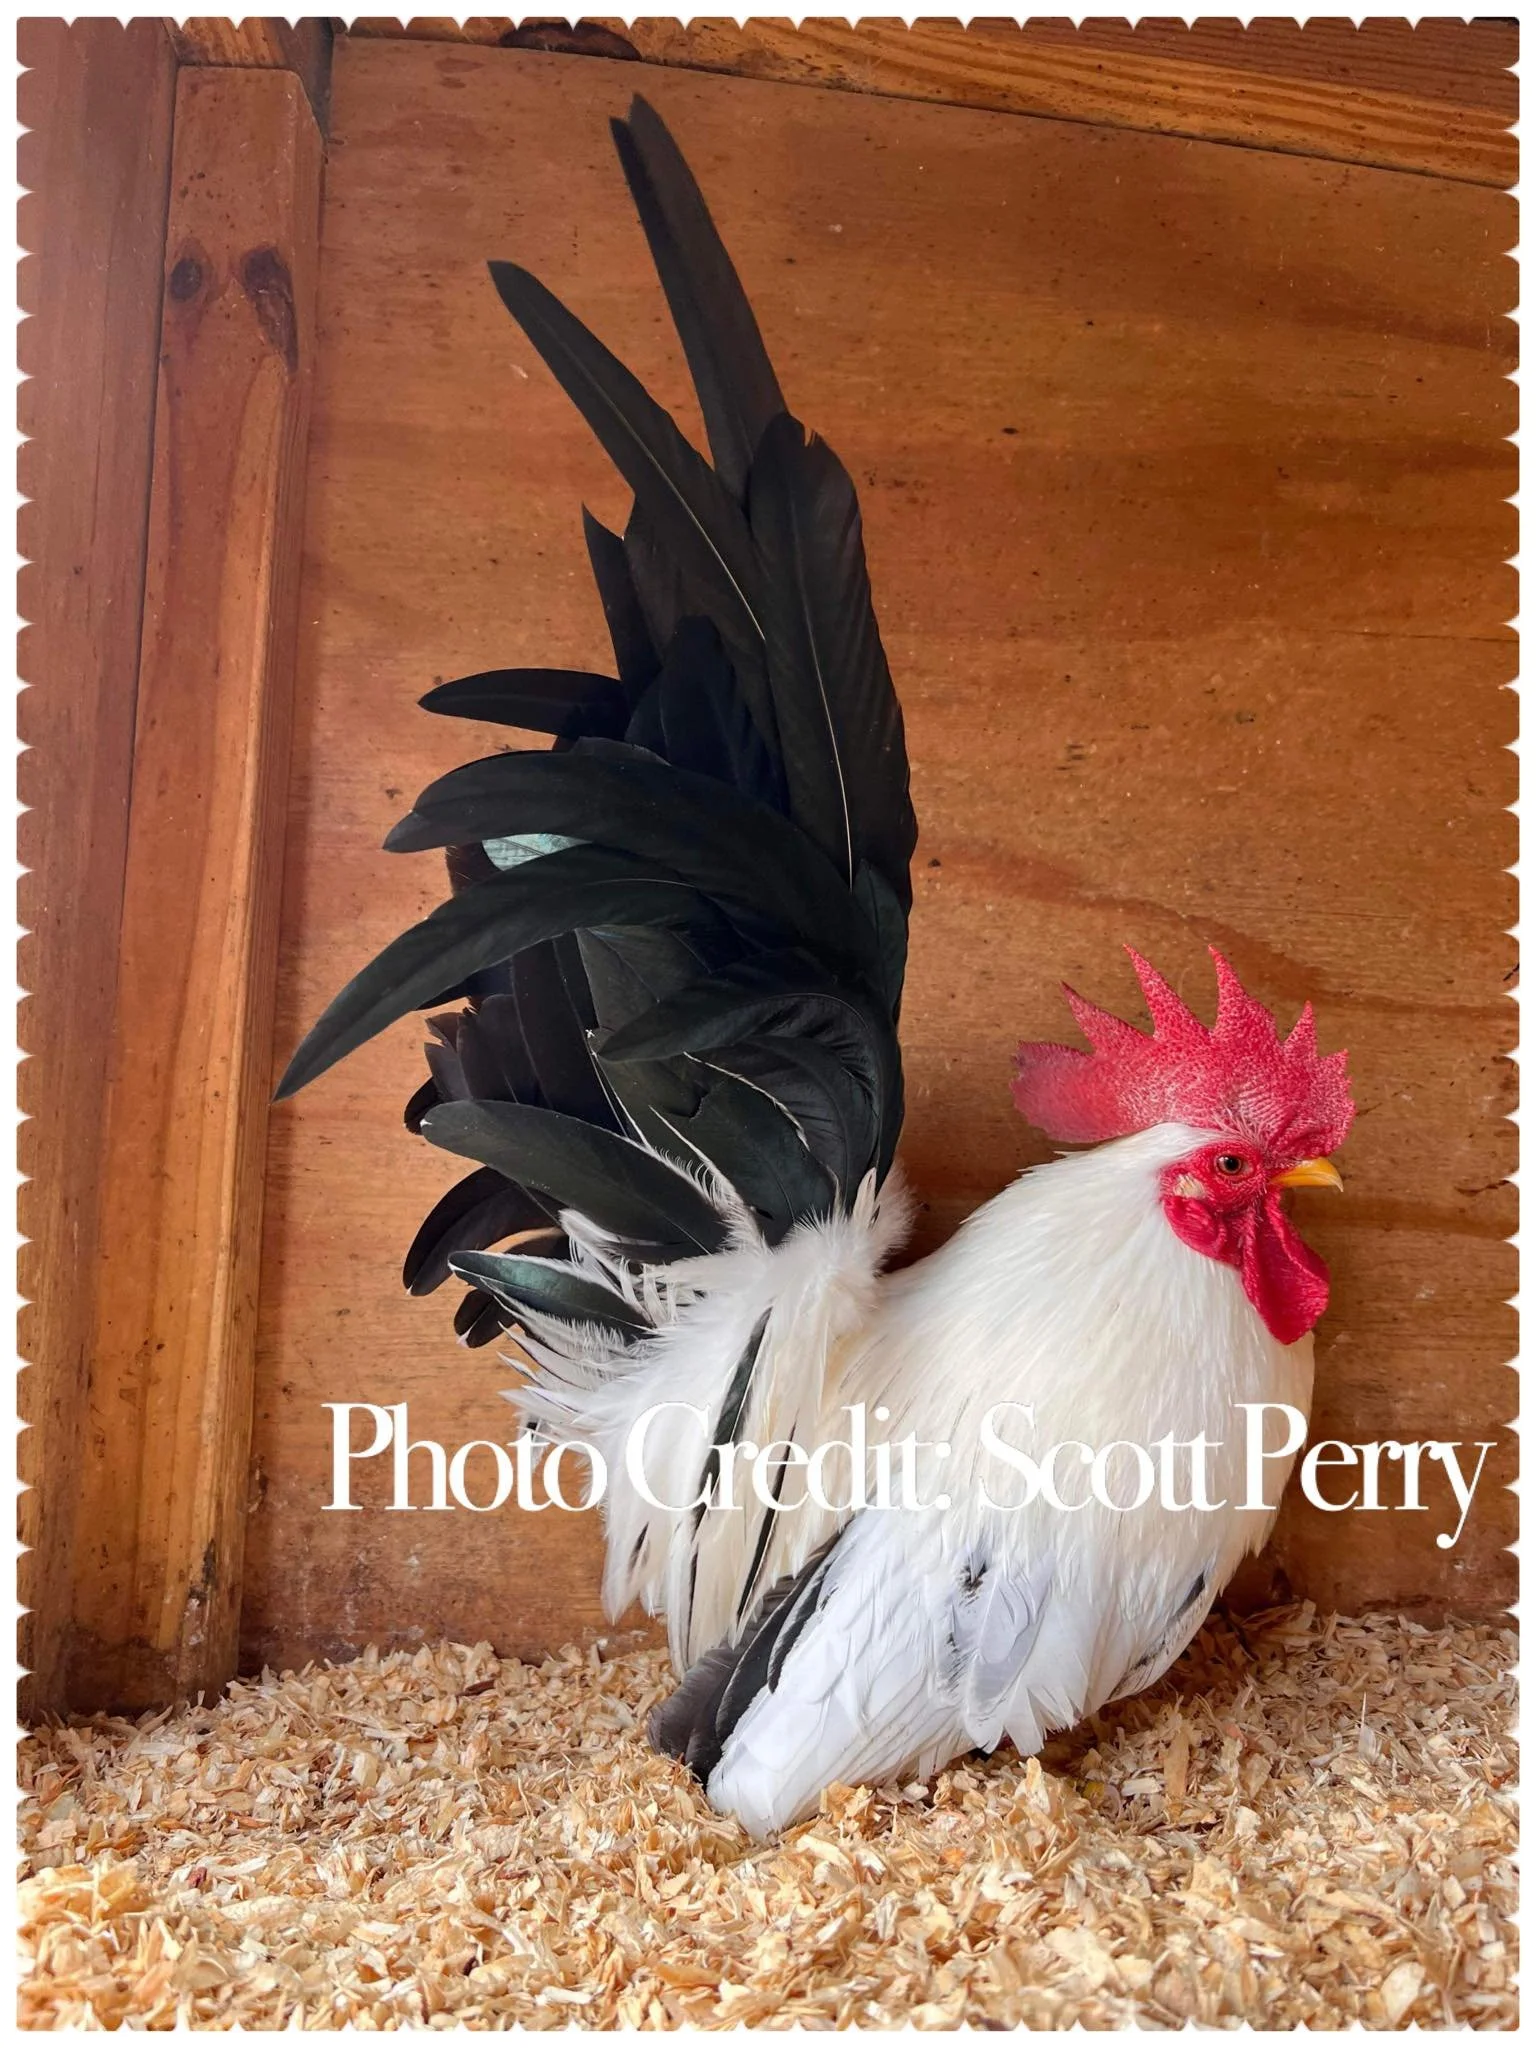
In the photo of the male Serama (Photo 5), owned and bred by Sherri Roy. You can see the vertical carriage they are known for. The wings are perfectly vertical and cover the legs almost to the ground. The tail’s angle is high and vertical with slightly curved sickle feathers. The chest is large, round, and set higher than an OEGB’s.

Photo 6 is a male “Serama.” Everything on this bird says OEGB. The tail and wing angle are wrong for a Serama but correct for an OEGB. The chest matches the OEGB chest exactly, as does the length of the back.
In conclusion, if you are interested in breeding and showing Serama, make sure you educate yourself on what a Serama should look like. Don’t go by what someone else says, because they may not know it themselves.

What is NPIP?
NPIP or the National Poultry Improvement Program is, as the name states, a national program. It’s voluntary for poultry breeders, however, it is required to ship birds and eggs across state lines. NPIP is fairly easy to sign up for by contacting your State Agriculture Department. They will then send out someone that will test your flock for Avian Influenza and Pullorum Typhoid.
Avian Influenza (AI) is a fairly well known disease as it has been in the news quite often. It’s a disease that is often spread by wild waterfowl, as well as other birds, and is incredibly contagious. Testing for it is as easy as swabbing each bird. Those swabs are then sent to a testing facility where the results are usually available within a few days. Unfortunately, if this test comes back positive the entire flock and sometimes flocks in the area must be euthanized in an effort to stop the spread of the virus. Some states do not require AI testing to be NPIP certified. If you plan to show in a different state it’s advised to get AI testing should the location of the show require AI negative results.
Pullorum Typhoid (PT) is tested by drawing a drop of blood from each bird’s wing. That drop of blood is mixed with a drop antigen that will give a positive or negative result instantly. The antigen is purple and if the bird is negative for PT the antigen will remain unchanged. Should the bird have PT, though, the antigen will become grainy. The purple coloring makes it easy to see. It should be noted that depending on how much blood the tester adds to the antigen the purple color may be more red. In some states the testing is more extensive and vials of blood are sent off for further testing. Nationally, all birds must be tested for PT.

In some states Mycoplasma Gallisepticum (MG) as well as Mycoplasma Synoviae (MS) are also included in the NPIP testing. This is a bacterial disease that causes respiratory issues in poultry. If positive for this test an NPIP certificate can not be issued.
When a person becomes NPIP they must follow the rules per their state to maintain their NPIP certificates. In some states it’s prohibited to purchase any birds from sources that are not NPIP certified. In the state of Washington, for example, it is very clear that certified participants are not to purchase birds from anyone that doesn’t participate in the NPIP, according to the Washington Department of Agriculture’s website.
It is ALWAYS recommended to quarantine any new birds away from the rest of your flock even if they are NPIP certified. Veterinarians and State Agricultural Departments advise quarantining for 30 days. Not only does this help prevent the spread of illnesses it also gives your new birds a chance to acclimate to their new surroundings and possibly new climate. Travel is stressful for birds when they’re going to new homes.
NPIP flocks must recertify at least every year, sometimes every 6 months. For some states it’s free and for some there are fees. If you plan to show outside of your state you’ll likely be required to be NPIP certified. Most show managers require proof of NPIP per their state rules in order to participate in their show.
Be advised that some states require permits to ship to or show birds. Check with the state you plan to ship into or show to see what requirements they may have.
To inquire about becoming NPIP certified contact your State’s Agriculture Department by clicking on your state at poultryimprovement.org then click on NPIP Participants by State/Territories.

Japanese Bantam vs. Serama
One of the smallest breeds of bantams, in addition to Serama are Japanese Bantam. Sometimes people confuse them with a pet quality Serama that has a horizontal carriage but even then there are differences between the two.
Here are photos of Japanese Bantams that were graciously submitted by a few Japanese Bantam breeders. I specifically looked for Japanese Bantams from exhibition breeders in order to have an honest comparison between the two.


Something I want to bring to your attention is that every one of these birds is standing up. They are a short legged breed. In the Serama world this is called “creeper leg” and is a fault that is a DQ. The next thing that is easy to see is their tails are MUCH taller than their bodies! For a lot of them that tail also goes toward their heads. If a Serama had a tail that angled in that direction it is called “squirrel tail”.
They are a short backed breed, much like Serama, however, that back is in more of a horizontal orientation vs the vertical orientation the Serama has. The wing carriage is also very horizontal which, again, differs from the vertical wing carriage of the Serama.
The chest, though it is large and round, they carry their chests low in relation to their body vs a Serama that has a higher chest carriage. Finally, the size of the comb and wattle, for the males especially, is much larger than that of a Serama. Serama should have a small comb and wattle.
In summary, though both are small bantams there are quite a few stark differences.

Is it Safe to Feed Uncooked Rice to Chickens?
Is it safe to feed uncooked rice to chickens? This question has been asked time and time again. There are, obviously, 2 schools of thought. One is that rice expands in the chicken’s crop posing a potential danger. One is that it doesn’t.
My experience with rice is cooking it for meals. It does expand quite a bit there but does it expand with just water and no cooking? My original thought was it requires high temperatures to make rice expand. I wanted to find out for myself.
I took 1/3 cup of dry, white rice in the measuring cup and added enough water to fill the cup, which amounted to 7 teaspons. I let it set and took photos.
The first thing I noticed when i added the water was how the rice stuck together. This is the starch on the outside of each grain of rice that is becoming sticky as it gets wet. This is why recipes tell you to rinse your rice if you want soft fluffy rice.
After 3 minutes I was surprised to see that the rice had swelled a touch. After 20 minutes there was quite a difference! I am the first to admit when I have gotten something wrong.


I used to say that rice has to be cooked for it to expand. That is absolutely wrong. Does it expand enough to burst their crop? It doesn’t look like it unless you feed a bird the whole bag. Is it safe to feed dry, uncooked rice to your chickens? Probably, in moderation, but I’ll let you decide with the information this tiny, completely unscientific experiment has produced.


Critiquing an Ayam Serama
Here’s a photo of one of my Ayam Serama. We’re going to go over what is good and bad about this boy.

First we’ll hit the bad. The white arrow is highlighting the fact that his wings are too short for his leg length, IMO. I’d like to see his wing tips almost touch his outer toe. He needs to pull his head back just a touch more. His eye should line up just behind his leg, which is indicated by the light blue line. The wings could come forward more, the front feather of his wing could line up closer to purple line.
The good: His tail is at a 65 degree angle. I actually measured it with a protractor. The yellow line for his tail needs to be aligned with the edge of his sickle feather but trying to do that on an IPhone is difficult! His chest is nice and round, the yellow circle how round his chest is. His tail is full but not so flowing that he looks like he has an Old English Game Bantam tail. His back is nice and short. He does not have scissor wing.
If I was to place him in a home I could be sneaky and say he is a Modern “type” Ayam Serama because of the longer legs or the shorter wings. That’s not the case. He is not a modern type. There are a ton of other attributes that make a modern a modern. He just has a fault in that area. If you are looking for good, show bloodlines to add to your flock don’t get caught up in a sales pitch and hone your “eye” so you can pick out the good and bad in a bird even if it’s your own!
It’s difficult sometimes to pick apart your own birds but in order to improve we have to be able to find things that need improvement and choose birds that can fill in those gaps in our breeding programs. You also don’t want to throw the baby out with the bath water. If there are more good things than bad you may want to keep the bird and pair it with something that can help improve those faults. That’s part of the fun of breeding is know you built your flock and your bloodlines one piece at a time.
Enjoy!!

Why Breeders Won’t Sell Chicks
There are 2 things to consider when answering this question. 1st, let’s answer this commonly asked question: Why do breeders not sell chicks? As with any breed, there is a lot of development that goes on between the day of hatch and sub-adult stage. Just like humans, children go through many changes as they mature. Any one who has seen children grow up knows what I’m referencing. One day that baby looks more like mom and next week looks like dad. As preteen and teenage years the kiddo goes through huge growth spurts until they’re done growing.
For chickens, towards the end of their growing stage, some can be well put together and some can fall apart. At 2 months of age a Serama can look very promising! At 3.5 months that same Serama could have gone through a growth spurt and the wheels fell off the bus. Many breeders won’t sell “culls” or birds that are pet quality as to not allow the genetics that caused that bird to be pet quality to pass on. Some will give them away to pet homes and some price them in various ways.
If the consumer is looking for particular traits they should wait until a bird is of an age that those traits lock in and stay. Some lines mature quickly, in 4-6 months, and some lines mature later, in 8-12 months. Each breeder should know their lines well enough to know when the birds will mature.
An excellent breeder is worth their weight in gold and will be willing to pick apart their own birds and tell you what they like AND don’t like about any particular bird. Find a breeder like that and you have found a breeder worth hanging onto! It also demonstrates that they really know the standard for the Serama breed.
The 2nd thing to consider is there are bantam breeds that look very similar if not identical to Serama at hatch. Old English Game Bantam and Japanese Bantam chicks will look very much the same. Barnyard mix bantams will also look very similar. You spend money on these chicks only to find out about 3-4 months later that they are not what you thought you were paying for. Unfortunately, many people have purchased chicks in the hopes of raising them and selling their offspring only to be told the whole flock they have aren’t anywhere close to Serama. They are then faced with what to do with this flock they have grown to love but aren’t what they thought they were.
If you don’t mind having barnyard mix chicks or a completely different breed then it probably doesn’t affect your decision, however, the price should reflect what you are purchasing. Patience is the name of the game when raising any breed of quality chicken.
Here is a photo of one of my own birds. This was an unauthorized hatch. We had free range Serama that are pet quality. We keep them around for bug control and entertainment! One hen snuck away and hatched chicks. Had I sold that lot of chicks the blue chick is what someone would’ve gotten. Is he a sweetheart? Yes. Is he a good representation of a Serama? That’s a big nope! Not even close. He’s huge, strung out and will never have that nice type that a great Serama should have.

What to Look for in a Correct American Serama
Here is a diagram of what to look for in a correct American Serama. This is a photo of Bruiser, an American Blue Serama. Traditional Serama have the exact same body type, with the only difference being color. An American Serama is one of 6 accepted colors in the American Bantam Association and 1 of those colors is accepted in the American Poultry Association. This particular boy was a multiple time champion and also placed Grand Champion at the 2023 SCNA Nationals over 151 other Serama as well as Champion male in the American Bantam Association in the in cage show, so he is indeed a good candidate to use as a guideline.
Serama are very upright, vertical birds. The blue line shows how the eye, the wing and the leg should line up when the bird is in pose. Bruiser doesn’t have his head pulled back quite as much as he could so his eye is in front of that line.
The red line shows where the front of tail should be. There is no space between his back and his tail as it should be. If the tail angles too far back from that line it is a fault. If there is a V or U shape made between the tail and the neck it is a fault. If the tail leans forward of that line it’s called “squirrel tail” and is a disqualifying fault and should not be used for breeding.
The chest is high and round. His chest starts to come right under his wattles, rounds out and then tucks right back in.
With yellow arrow shows where the wing tips should end. You can see his toes but not his “ankles”. Shorter and the wings aren’t correct. Longer and they drag the ground. Some birds will tuck their wings vertically, even in a “pose”, if the wings are too long. If the wings are the correct length but they carry them above the “hocks” or the “knees” of the bird this is a major fault.
The orange circle shows a fault he had. This is called scissor wing. It’s where the primary feathers peek out from behind the secondary feathers. His wasn’t very bad but there are some that are pretty “severe”. It’s not a fault that has a point deduction but it could in the future. There are a couple of theories as to why that happens. One is environmental, not flying and strengthening the wings, another is genetic.
In a serious competition if there are two birds that are equally matched and one doesn’t have scissor wing while the other does the one without would be placed higher.